How to use liquid yeast
Liquid yeast gives you the widest choice of fresh yeast strains for every beer style imaginable – but it takes a little love to get the best results!
There are many more strains of liquid yeast available than dried yeast. Not all yeast strains take well to drying, and the yeast has to be specially prepared and processed. With all that done, dried yeast has an extraordinary shelf life and is extremely easy to use.
On the other hand, liquid yeast needs more looking after, but when used correctly can give the best results. Choosing the right yeast makes a big difference, so the much wider choice of liquid yeasts means you can dial in on the perfect strain for your beer.
Fortunately, it’s not that hard to look after liquid yeast. Let’s find out how!
Start with the best yeast possible
All yeasts are living products, but where dried yeasts sleep in suspended animation until they are rehydrated, liquid yeasts are awake and restless. Like any fresh produce, over time, liquid yeasts will degrade until they are unusable. This happens faster when the yeast is warm, and much slower when stored cold.
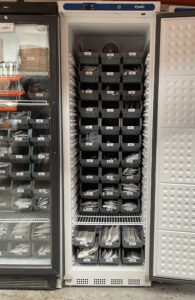
This degradation begins the moment the yeast is packaged at the manufacturer. We receive yeast in specially refridgerated boxes and check the temperature as soon as it arrives, ensuring it hasn’t got warm along the way. The yeast is then kept in our fridges until it’s sent out to you, when it gets wrapped with an ice pack to keep it cool in transit.

Like other fresh products, a short spell out of the cold won’t spell instant doom for your liquid yeast – but we recommend you unpack and put any liquid yeast into your fridge as soon as possible when you receive it.
Before you brew
We’ve kept the liquid yeast nice and cold – now what?
First we need to make sure there’s enough yeast in the packet for your particular brew. Different yeast labs package different amounts of yeast with different stated shelf lives, so it can be a little tricky working out exactly how much viable yeast you have.
A simple rule of thumb is that if your brew is:
- Over 1.050 starting gravity (OG)
- Over 20L into the fermenter
- or if your packet of yeast is within two weeks of the best before date
… you should consider a yeast starter to build up more yeast.
All yeasts have a preferred temperature range for fermentation – check our product page or on the back of the packet to find out the range for the particular strain you’re using. Before you pitch the yeast, it should be as close to the preferred range as possible to avoid heat shock from rapid temperature changes.
For lager strains that prefer it cold, you might be able to use your liquid yeast straight from the fridge. For warm-loving ale strains, take the yeast out of the fridge on the morning of your brew to allow the packet to slowly come up to pitching temperature while you get on with mashing and boiling.
With most liquid yeasts, you simply open the packet and pour into your wort (we spray both our scissors and the packets with sanitiser spray just in case). With liquid yeasts from Wyeast, they include a packet of nutrients to help wake up the yeast before you use it – like a mini starter. Follow the instructions on the packet to activate the nutrients and be careful when pouring out the yeast not to drop the nutrient pack into your wort as well!
Recharging your yeast
The great thing about yeast is that it’s a living thing – it’s not an inert additive. So if you need more, you can simply grow some!
This is called making a yeast starter. As mentioned above, there are several scenarios where it’s highly recommended to make a starter, though it’s pretty much never a bad idea, as it guarantees your liquid yeast is wide awake and raring to get at the sugars in your brew!

To make a starter, you need some basic wort – something weak and simple for the yeast to east – and a vessel for it to grow it.
You can make starter wort by simply diluting dried malt extract (DME). Another option is to save some wort from another brew: you can freeze this so it keeps until you’re ready. You can also get Propper pre-made starter wort.
Starter wort should be under 1.040 gravity to keep life simple for the yeast. There’s no need to include hops, though there’s no harm in hops being present if you are using wort from another brew. You might also choose to include a pinch of yeast nutrient to really get things going.
More info: using DME to make a yeast starter
Your starter can be made in any sanitised vessel large enough for your wort and for the yeast to grow. This can be as simple as a plastic bottle or jug, or you can use a chemist’s conical flask. Seal off the top of your vessel with sanitised tinfoil to allow the yeast to breathe and to keep flies and other nasties out.
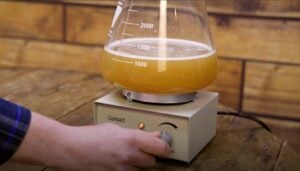
Yeast grows fastest with plenty of oxygen, so give your starter a shake every few hours. A stir plate will keep the starter in constant agitation, growing the most yeast possible, but it’s not a absolute essential.
When the starter has finished fermenting – usually no more than 48 hours after you see the first activity – put it in the fridge overnight. This will cause the yeast to fall out of suspension, allowing you to carefully pour off the used-up wort and leaving behind just the creamy yeast slurry.
If you’re in a hurry, there’s no harm in pouring the entire starter into your fermenter – though, with larger starters, you might not want to dilute your brew with so much used-up starter wort, especially as the fast growth in a starter doesn’t typically result in a particularly tasty end product.

Also, if you used a stir plate to make your starter, don’t forget to take out the magnetic stir bar before you pour into your fermenter. Another small magnet on the outside of your starter is all you need to drag and hold the bar out of the way while you pour out the yeast.
Troubleshooting
If you begin with:
- yeast stored correctly
- grown up to the right amount as required
- pitched at the right temperature for that strain
- with enough nutrients in your wort
- and proper aeration at pitching
… then you are as near to guaranteed to have a strong, healthy, and (most importantly) a good-tasting fermentation.
Almost all issues with fermentation that we encounter can be traced back to one of these points. However, this is real life, so mistakes unfortunately can and do happen.
If you find yourself with a brew that isn’t fermenting, or stops earlier than it should, then the answer is almost always to pitch more healthy, fresh yeast. We know that it can take a little while to build up a starter, even assuming you have some of the same liquid yeast you started with, so a much more convenient option is dried yeast. It’s a good idea to always keep a few packets of dried yeast in your fridge for emergencies – they have a very long shelf life, and are relatively inexpensive. You might not have the perfect strain for your beer, but that’s better than the brew failing altogether!
Check out our video all about keeping yeast healthy, and remember to subscribe to our YouTube channel for all the latest brews and reviews from The Malt Miller.

