Managing and using Brewlab yeast slopes.
Here at The Malt Miller HQ, we are excited to be working with Brewlab to bring their yeast slopes to home brewers.
Brewlab’s Keith Thomas and Alison Douglas have prepared some information for us to help us all understand the use and versatility of their slopes.
What’s special about a Brewlab yeast slope? Isn’t packet yeast perfect?
Home brewers familiar with handling dried and liquid yeast will have experience of how yeast works in practice and how to manage fermentations to obtain best results.
Experience also tells us how yeast can be mistreated and result in failed fermentations. Temperature control is critical to yeast performance as is hygiene and limiting exposure to stress. Brewers are also aware that dried yeast has a far longer shelf life than liquid yeast and is available to inoculate larger volumes so allowing direct addition to a brew whenever required. Alternatively, a tube of wet yeast requires a starter culture to increase cell numbers before pitching and also deteriorates rapidly during storage.
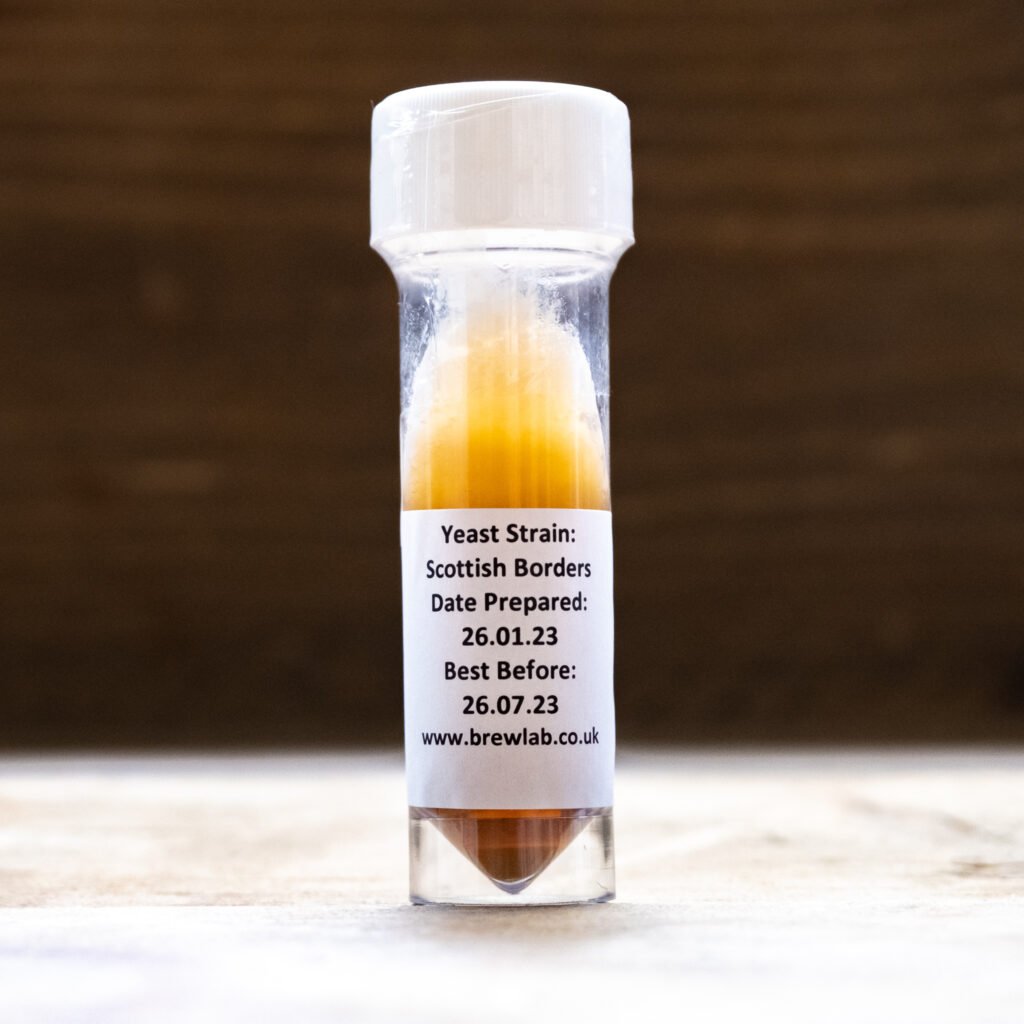
Yeast slopes (also termed slants) are intermediate between wet and dried yeast. They contain viable cells from a purified stock culture and carry no contamination. Not all yeasts can be dried successfully so slopes offer access to a wider range of strains. However, like liquid yeast, yeast from a slope need to be bulked up in a starter culture, and need hygienic handling as contamination at an early stage can ruin the brew.
So, how to proceed with a slope. First prepare the starter culture media, ideally wort similar to that of your intended brew. This media needs to be as sterile as possible so collect direct from the boil into a clean and sterilized glass or stainless steel container. A litre is a good volume to target although between 300 and 500 ml may be adequate for up to a 20 litre brew if carefully managed.
Success depends on maximising the number of cells as well as their viability. Advised pitching rates for a good fermentation of a brew gravity below 1.050 are 10 million cells per ml (although some sources recommend 7.5 or 8 million per ml so allowing some flexibility). 20 litres thus needs 20 * 1000 * 10 million cells which = 200,000 million cells (or 2*1012 if you work in indices).
A standard slope can hold around 1,000 million cells (1*109) so the starter culture needs to increase this by 2,000 times – quite a big ask but not impossible. Yeast will multiply best if they start at a low density. Pitching a slope into a litre of wort will give you around 1 million cells per ml which is relatively low. A maximal yeast density of 250 million cells per ml (2.5 * 108) is possible after optimal growth (say 30oC fermentation with good aeration through continual agitation). This would achieve the target cell count for a 20 litre from 800 ml of starter. Pitching the slope into 1,000 ml will allow for shortfall in growth.
Once growth is complete in the starter it is advised to cool in a fridge to allow the cells to settle. The spent wort can be decanted, and the concentrated cells pitched into your wort – although you can pitch the full starter if you wish. Storage is limited though as cells will progressively die over the next 7 days so use as soon as possible.
OK so that’s the basics. Let’s look at some questions:
What would be the effect of a low pitch – say if only 300 ml were used for the starter?
The lower volume of starter the lower the cell count and the slower the initial fermentation. This may still produce an acceptable beer but you would need to ensure that the temperature didn’t drop. A low yeast count will mean there is less heat generated in the early phase of fermentation so keeping the ferment warm (20 – 23oC or so) is essential. If the brew shows no sign of fermentation after 30 hours it may be rescued with additional yeast – perhaps from a previous brew or a packet.
What are the limits on the wort gravity used for the starter?
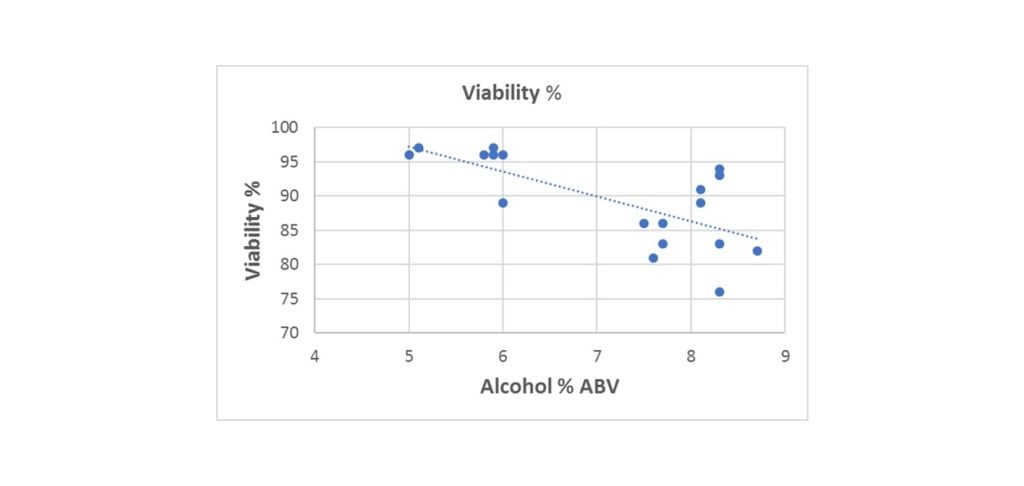
Standard growth theory says that the more sugar present the greater the growth and this is true in general. However, in high gravity worts cells are more stressed so reducing the overall viability as shown below. There is thus a balance and a cut off of 1.055 is suggested as maximum gravity. This is strain dependent so having knowledge of a strain’s stress resistance may stretch this limit.

How should the starter culture be managed?
Temperature is a critical issue. Most yeast strains will grow maximally around 30oC so having an incubator system is desirable. Agitation is also valuable as it will draw air into the wort and provide oxygenation which further encourages growth. A shaking platform would be ideal but regular shaking will help – however, take care in mid fermentation as gas build up may cause a gushing of wort if shaken too forcefully.
Is it worth adding nutrients to the starter wort?
Nutrients at the right concentration will assist yeast growth and are worth adding. However, ensure that the dosing is correct as too much, particularly of zinc, can inhibit growth. Having a nutritious starter will allow the yeast to accumulate these and assist later growth.
How can contamination be minimised?
Contamination hazards are unavoidable but can be minimised by working in a hygienic location and ensuring that surfaces and equipment are sanitised. Preparing and inoculating starters in a kitchen is undesirable as many microbes from food will be present so look for a quieter area but also away from fumes, and outdoor draughts. Working around a burner helps provide an aseptic environment while lab gloves limit exposure from microbes on your skin.
What containers are suitable for starter culture incubation?
Glass flasks and other containers are commonly used in laboratories and may be available from online suppliers. Because of foam production it is best to have a container much larger than the volume cultivated – say 2 litres for a 1 litre starter. This will provide a good air exposure when agitated and avoid an overflow during vigorous growth. Stopper a flask with foam or non-absorbent cotton wool to allow gas exchange. Alternatives include a two litre PET water bottle, kilner jars or large glass bottles with narrow necks. You can sanitise resistant glass with boiling water, but PET will need use of a chemical sanitiser.
What are low and high wort mineral conditions?
For the wort mineral conditions we are referring to the calcium level and balance of sulphates and chlorides in the brew liquor. In broad terms low mineral wort would have a calcium concentration below 100 mg/litre, a sulphate concentration below 150 mg/litre and a chloride concentration up to 300 mg per litre. High mineral wort would have a calcium concentration above 100 mg per litre, a sulphate concentration above 200 and a chloride concentration also above 200 mg per litre.
In practice how many yeast cells can you expect to propagate in 250ml of wort?
Brewlabs have carried out some yeast propagation trails and if the entire slope was scraped from the surface using a sterile loop and pitched in to 250ml work and agitated 22 degrees C after 48 hours the cell count was 108,000million cells in the 250ml sample. If the yeast is rinsed off and the majority removed 96,000million cells in the 250ml of wort under the same growth conditions.
Yeast slope procedure.
- Keep your slope refrigerated until use – but not frozen.
- Prepare the wort for the starter culture. Ideally use hopped wort which will inhibit bacterial growth. Collect boiled wort into the starter culture vessel (bottle or flask) and allow to cool. This will help sterilize the vessel. If using a PET bottle (eg, a mineral water bottle) fill with sanitiser and leave to soak before emptying and filling.
- When cool add the yeast from the slope. The yeast is growing as the surface layer on the agar. To remove as much yeast as possible either carefully add wort to the bottle, ensure bottle top is secure and shake hard to suspend the cells. Not all may suspect initially and if any remain repeat with fresh wort. Alternatively, if you have a sterile loop scrape the surface of the agar to suspend the cells into the wort. Observe good hygiene during the suspension and transfer as contamination at this stage may compromise the yeast growth and spoil the beer.
- Disperse the yeast through the starter culture with a careful swirl and leave to incubate between 25 and 30oC. Agitate regularly but with care to avoid sudden release of carbon dioxide and Overfoaming.
- When the fermentation is complete, and the wort has clarified pour off the supernatant to leave the yeast sediment and pitch this into your brew. Some strains will produce clearer worth than others depending on their flocculation ability. If you wish pitch the full starter culture into your brew – some different fermentation flavours may transfer and be apparent in your beer.
- Clean and sterilize the starter vessel directly so contamination does not grow on the residual wort.
- Start your fermentation at between 20 and 23oC to enhance the initial growth. Temperature may be reduced once growth is established if you wish. Add yeast aid if you wish or if you are brewing with high adjunct concentrations.
- Monitor your brew for its gravity, head formation and clarity. It may take longer to ferment than if using a packet yeast but with a good wort composition should be complete within 6-7 days for a low and mid gravity beers (up to 1.050). Stronger beers may be slower and benefit from a larger starter addition up to say 25% more.
- Re-cropping yeast is possible eg, using a sterile spoon to remove a yeast head mid-way through the fermentation. This will keep for up to 7 days if refrigerated.
- Take records of your brews with particular focus on gravity profiles, clarity to indicate flocculation and flavour. All of these may change if you re-pitch repeatedly and will indicate the effects of mutation.
You can follow Brewlab on Facebook


How would you advise preparing a brewlab slant for an 80 litre brew. Would the use of a 5 litre demijohn be sufficient, with, say, three litres of a starter culture. How long would you need to prepare this before the actual brew?
Hey William, This depends on some variables such as what yeast and what beer, temperature of fermentation etc. There are online calculators that can be used, it depends on how scientific you would like to be.Personally I would follow the initial instructions. Then I would decant the wort from the top of the yeast slurry and tap up to one 600ml, repeat up to 1200ml then again at 2400.